Root systems are responsible for all water and nutrient uptake by the plant and they provide the physical anchoring and support of the plant structure. Each plant and crop species has its own “personality” and growth habits, and root systems have unique characteristics among plants species.
In general plant root systems constitute 30-50% of the total plant dry matter. When post-harvest plant residues are incorporated into the soil, the root systems provide a significant contribution to that plant material and final carbon (C) contributions to the soil.
The first thing a seed develops in the germination process is a primary root that grows downward into the soil. We often refer to this as the “stinger” root that extends from a germinating seed. New cells are formed at the tip of the primary root as it extends downward into the soil forming a “thimble-shaped” cluster of cells called a root cap (Figure 1). The root cap serves as a type of shield that helps the root penetrate the soil matrix and protect the developing root tissue. As the root grows downward into the soil the root cap cells are sloughed off creating a slimy surface that helps lubricate the root as it extends deeper.
The growing point (apical meristem) for the developing root is just behind the root cap and this is the zone of new cell formation that facilitates root growth and replaces the cells that are sloughed off as the root grows through the soil. The new cells elongate and serve to extend the roots into the soil (Figure 1).
The most active parts of the plant root system for mineral nutrient and water uptake are in the tiny root hairs that are formed in zone behind the apical meristem. Root hairs are only formed in the relatively new and freshly developed root tissue. The root hairs are extremely small, tender, and physiologically active. Root hairs are often referred to as “feeder roots” due to their high-level of activity in securing water and nutrients from the soil for the growing plant. In the process of transplanting, it is important to protect the feeder roots and promote their health to ensure rapid adaptation to the new soil environment.
Young plants have the capacity to develop basic aboveground tissue to perform sufficient photosynthesis for establishment and growth due to the plant’s ability to take up mineral nutrients and water from the soil from the root system. Sometimes it can appear that plants are not growing rapidly while the young crop is investing energy and resources into root system development, which is the foundation for the subsequent plant growth and development.
The depth of the roots will vary according to the soil physical conditions and effective soil depth, soil fertility and salinity management, plant-available water, and of course the natural rooting characteristics of the plant.
In general, there are two basic types of plant root systems. Broadleaf plants (dicotyledonous) and coniferous plants (gymnosperms) commonly have a taproot system the extends downward through the soil developing root branches from the primary root stem (Figure 2).
Grass plants and their relatives (monocotyledonous plants) produce fibrous root systems that branch extensively and radiate out into the soil from the plant base (Figure 2).
In general, taproots tend to be deeper with extensive branching from the primary root, develop woody tissue on older roots, and generally long-lived. In contrast, fibrous roots tend to be smaller, short-lived, with less branching. As roots age, they become more important in conducting nutrients and water to the growing points of the plant, both above and belowground. In all cases, the young and freshly developed root hairs (feeder roots) are the primary zone of water and mineral nutrient uptake.
As root systems age, the older roots will die, and new root tissue is formed. As dead roots are sloughed off, the discarded tissue is attacked by naturally occurring, beneficial soil organisms (bacteria, fungi, protozoa, and worms) the release mineral nutrients and produce soil organic matter. Turnover of root tissue is an extremely important aspect of plant contributions to soil carbon (C) and organic matter.
We do not see the plant root system on a regular basis and we cannot watch root hair development. But it is good to be conscious of root system development since all mineral nutrient, water uptake, and structural support is provided through the roots. So, it is good to review and understand root structure and function as we work to manage crop plants for optimum growth and development.
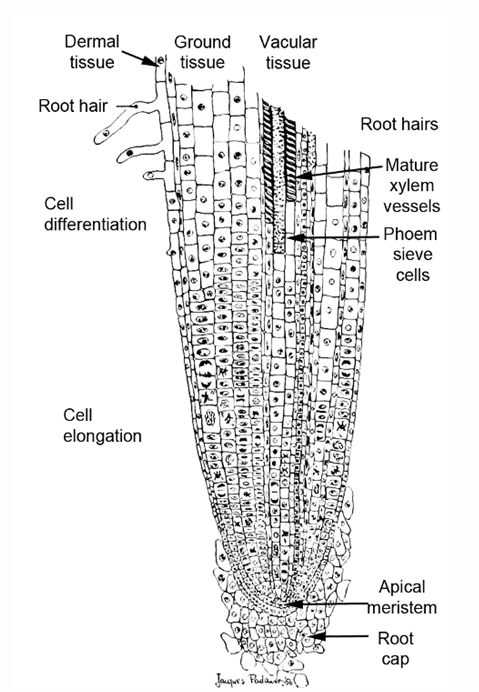
Figure 1. Basic root tip anatomy.
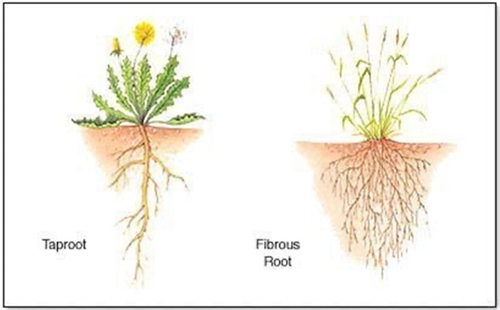
Figure 2. Examples of taproot and fibrous root systems.
I hope you are frolicking in the fields of wildflowers picking the prettiest bugs.
I was scheduled to interview for plant pathologist position at Yuma on October 18, 2019. Few weeks before that date, I emailed Dr. Palumbo asking about the agriculture system in Yuma and what will be expected of me. He sent me every information that one can think of, which at the time I thought oh how nice!
When I started the position here and saw how much he does and how much busy he stays, I was eternally grateful of the time he took to provide me all the information, especially to someone he did not know at all.
Fast forward to first month at my job someone told me that the community wants me to be the Palumbo of Plant Pathology and I remember thinking what a big thing to ask..
He was my next-door mentor, and I would stop by with questions all the time especially after passing of my predecessor Dr. Matheron. Dr. Palumbo was always there to answer any question, gave me that little boost I needed, a little courage to write that email I needed to write, a rigid answer to stand my ground if needed. And not to mention the plant diagnosis. When the submitted samples did not look like a pathogen, taking samples to his office where he would look for insects with his little handheld lenses was one of my favorite times.
I also got to work with him in couple of projects, and he would tell me “call me John”. Uhh no, that was never going to happen.. until my last interaction with him, I would fluster when I talked to him, I would get nervous to have one of my idols listening to ME? Most times, I would forget what I was going to ask but at the same time be incredibly flabbergasted by the fact that I get to work next to this legend of a man, and get his opinions about pest management. Though I really did not like giving talks after him, as honestly, I would have nothing to offer after he has talked. Every time he waved at me in a meeting, I would blush and keep smiling for minutes, and I always knew I will forever be a fangirl..
Until we meet again.
A technique that I’ve been curious about for some time now to minimize the number of weeds close to crop plants is the use of early (seedling stage of growth) close cultivation. Early close cultivation can be accomplished using a camera guided cultivator equipped with specially designed cultivating tools. Examples of the technology and technique were demoed at our 2016 and 2022 AgTech Field Days by K.U.L.T.-Kress, LLC1, the manufacturer of the equipment. The systems basically comprised a camera vision system for tracking the crop row, a toolbar attached to a parallel linkage that facilitated side-to-side movement and small cultivator assemblies for each of the seedlines (Fig. 1). In the demos conducted in lettuce, cultivating tools were positioned such that the uncultivated band was only about 2” wide (Fig. 2). If the crop were thinned by hand hoe or chemically, only a small area (roughly 2” x 2”) around the keeper plant would remain that had not been cultivated or treated with an herbicide material (Fig. 3). Assuming that existing weeds were controlled, and no new weeds emerge, the number of weeds close to the crop plant would be minimal. I realize soil disturbance near the crop plant is not desired but cultivating 1” away from seedling lettuce should be comparable to, and not cause any more crop injury than thinning seedlings spaced 2” apart with a hand hoe. I’m curious what your thoughts are on this. I’d love to hear your feedback.
[1] Reference to a product or company is for specific information only and does not
endorse or recommend that product or company to the exclusion of others that
may be suitable.
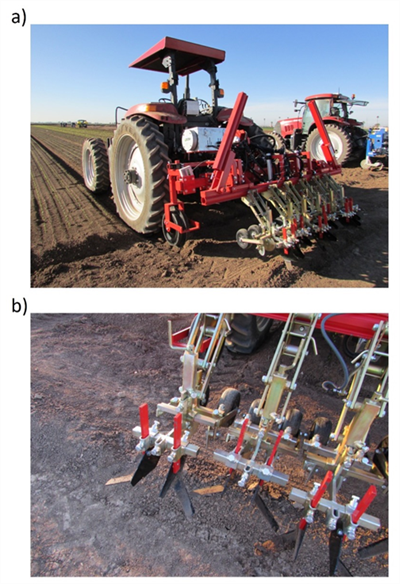
Fig. 1. K.U.L.T.-Kress camera guided cultivator (a) equipped with cultivating tools
designed for close cultivation (b). (Photo credits: Mazin Saber, University of
Arizona)
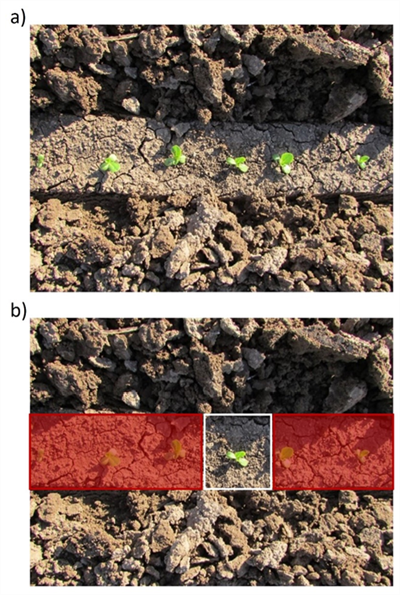
Fig. 2. Close cultivation of seedling lettuce with a camera guided
cultivator. Close up view (a) and far view (b). (Photo credits: Mazin Saber,
University of Arizona)
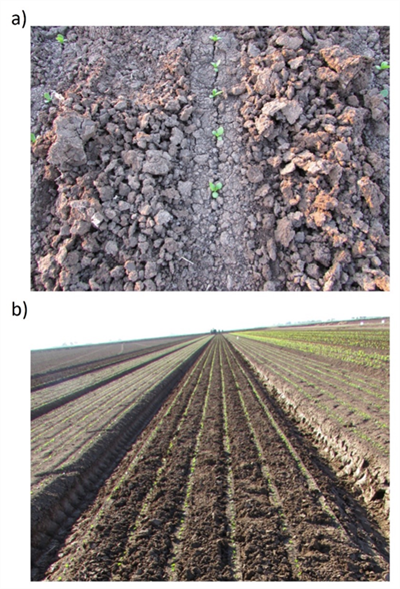
Fig. 3. Close cultivation of seedling lettuce with camera guided
cultivator leaves a roughly 2” wide uncultivated band around the
seedline (a). Thinning by hand hoe or chemically would kill plants in the
seedline (red shaded area) and leave a small area (roughly 2” x 2”)
(indicated by white box) around the keeper plant that had not been
cultivated or treated with an herbicidal material (b). Assuming no new
weeds emerge, the number of weeds near the crop plant that are
difficult and time consuming to remove is minimal.
Fig. 4. Video of camera guided cultivator equipped with cultivating tools
designed for close cultivation operating in six-line seedling romaine
lettuce. Click here or on the image to see the video. (Video credit: Mazin
Saber, University of Arizona)
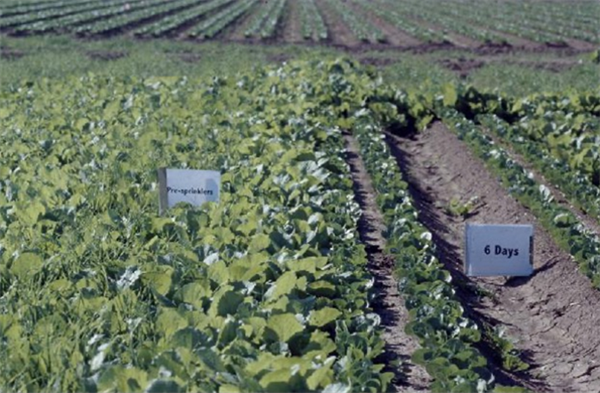
In the year 2000 Weed scientist and Area Agriculture Agent Barry Tickes from the University of Arizona Yuma Agricultural Center conducted many evaluations to determine the best application method for Pronamide Herbicide (Kerb) in lettuce. His studies revealed that in the low desert the product was losing significant efficacy because it was applied right after planting and before starting sprinkler irrigation. Pronamide is very soluble in water and was often leached below weed seeds prior to their germination.The goal of these projects was to delay the application of the product to have it available at the right time for weed germination. To do this Tickes stopped the sprinkler irrigation at different timings before weed germination and sprayed plots with a CO2 experimental backpack in the mud.
He demonstrated that Kerb applications should be delayed from 1 to 6 days after starting sprinklers depending on the time of the season. Delayed applications at the time were done with aerial applications, but after the terrorist’s attacks 21 years ago all air traffic was suspended. Then PCAs asked if the product could be chemigated (applied through the sprinkler irrigation). To answer this question Tickes conducted several trials in Yuma.
Surprisingly the results revealed that the product performed better chemigated than applied by air. Today most of the Kerb in Arizona is chemigated and applied in delayed applications, also the method is extensively used in California.
It all started with a little trial in a Yuma Experiment Station that demonstrated delayed applications work. Then 9/11created the circumstances that forced the industry to take that course. If you would like to review the original data from this research please visit: Timing Kerb Applications in Lettuce and Evaluation of Kerb Applied by Sprinkler Irrigation to Lettuce both by Barry Tickes.
Timing Kerb Applications in Lettuce
